

Advice from our experts at EastWest Physiotherapy in Burnaby, BC.
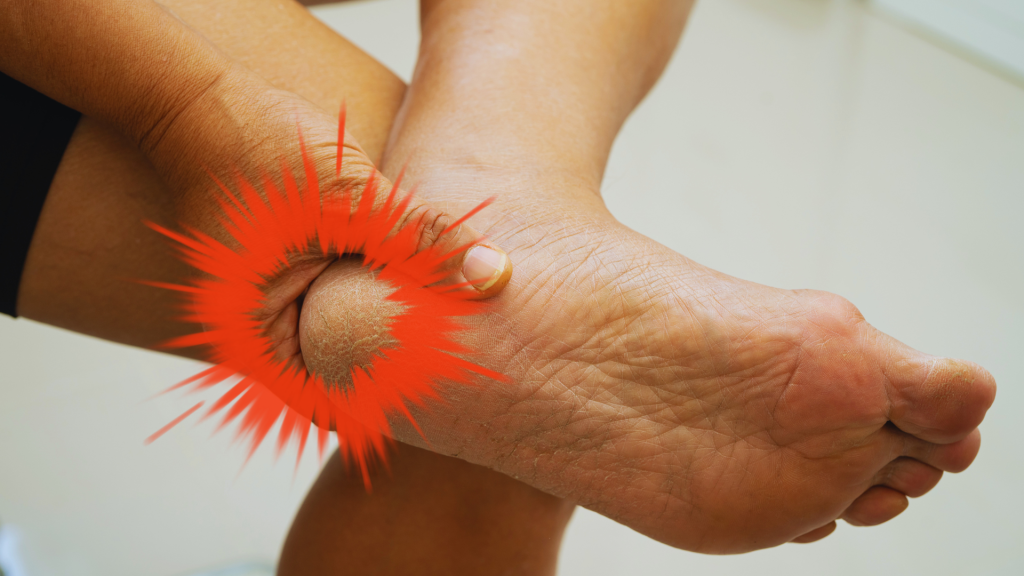
You’ve probably Googled or chatGPTed “heel pain exercises” at some point. Most likely, you have found the eccentric heel drop off a step on the stairs for example, that classic move where you slowly lower your heel below the edge. You gave it a try for a few weeks. It didn’t help. In fact, it may have actually made things worse. Giving up? Don’t.
There’s a good reason for that. And understanding it might be the thing that finally gets your heel better. At EastWest Physiotherapy Burnaby, we see this condition commonly, know some of the common mistakes and recommendations given, and can successfully provide treatment techniques and advice to help you get rid of it. Digging into recent research articles allows us to have the most up to date information on how to treat this stubborn condition.
A 2025 study published in the British Journal of Sports Medicine found that how you load the Achilles tendon matters just as much as how much you load it. Here’s what that means for your recovery.
First things first, where exactly does it hurt?
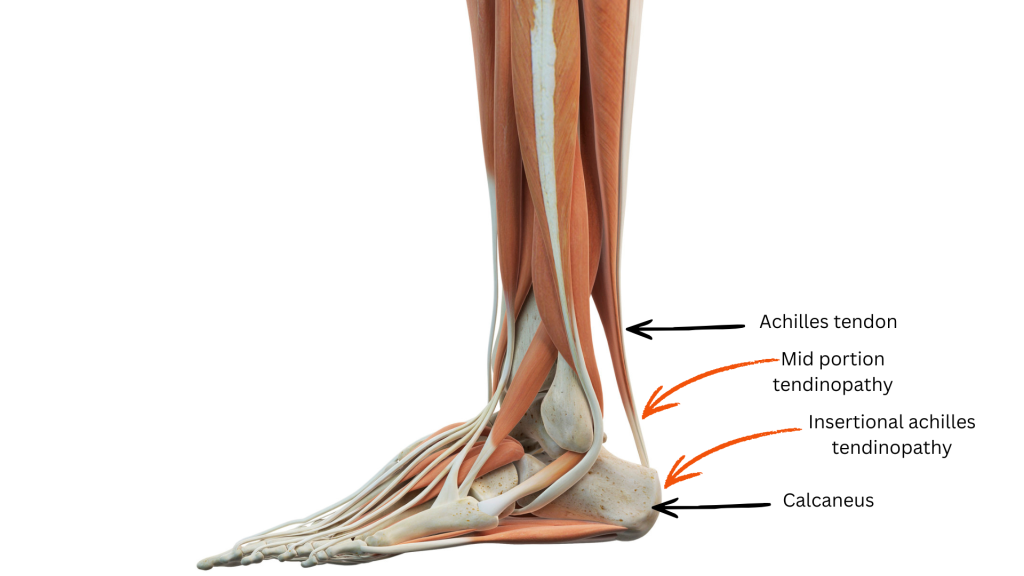
The Achilles tendon originates from the calf muscle and attaches to the back of your heel bone (calcaneus). That attachment point is called the insertion, and pain right there, at the very base of the tendon where it meets the heel bone, is what we call insertional Achilles tendinopathy.
It’s different from the more common midportion tendinopathy, which sits a few centimetres higher up the tendon. That distinction may sound minor, but this key difference changes how you should be treating it. The wrong recommendation for one will be ineffective in treating the other.
Most people with insertional heel pain feels worse the first time they step on the ground in the morning, or after long periods of sitting, or at the start of a run. It often eases once you get moving. Then the same thing happens the next day. That pattern is very typical of this condition. However, with mid-portion achilles tendinopathy may present similarly, which drives practitioners providing the same advice to that condition.
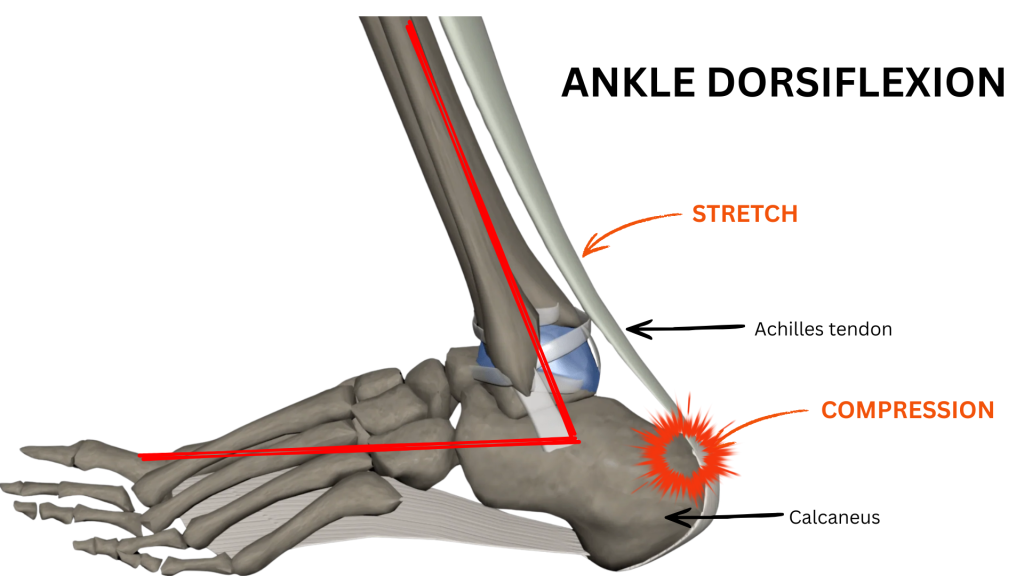
The location also tells us something important about what’s driving the pain. At the insertion, the tendon gets pulled and compressed at the same time. Double whammy. Every time your ankle bends upward (think walking uphill, stretching your calf, heel drops on a step), the achilles insertion site gets pinched between the tendon and the top of the heel bone. Do that repeatedly to an irritated tendon, it never gets a chance to settle and heal. Along with less blood flow in that area, healing really slows.
What the new research actually found
A 2025 randomised clinical trial published in the British Journal of Sports Medicine by Pringels and colleagues compared two approaches to rehabilitating insertional Achilles tendinopathy over 24 weeks.
Both groups did the same exercises. The same four stages, the same general structure, the same time commitment. The only difference was whether dorsiflexion (ankle bending upward) was restricted during those exercises.
One group kept heel lifts in throughout (prevents over dorsiflexion), avoided calf stretches, and stopped ankle movement before the heel reached neutral. The other group trained through a full range of motion as you’d normally expect.
At both 12 weeks and 24 weeks, the group that limited compression (limited dorsiflexion) came out ahead. And a separate 2025 expert consensus study confirmed what the trial showed. Controlling how far the ankle moves during exercise is the number one variable for this specific condition.
The four-stage program
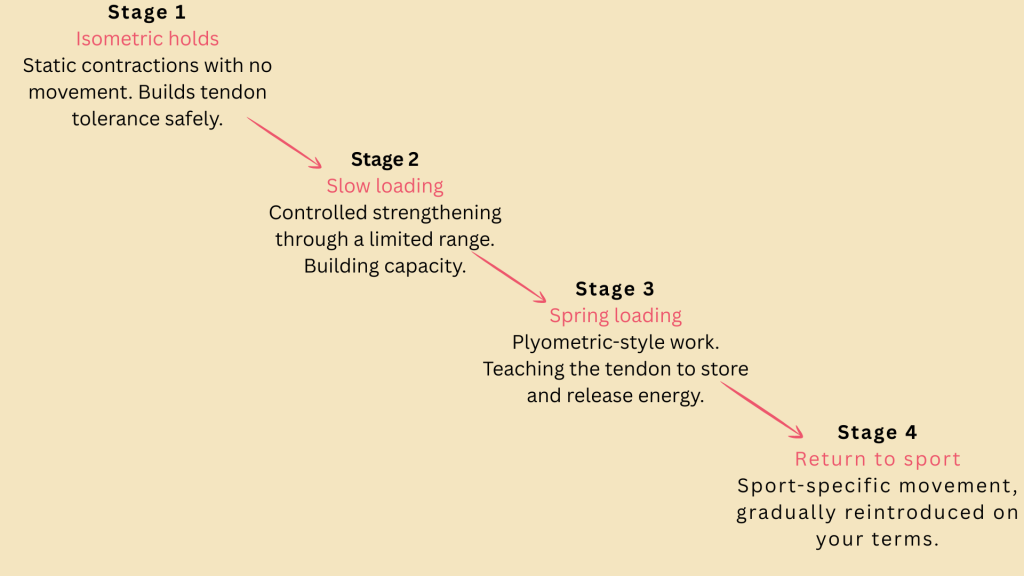
Stage 1: Isometric holds. The starting point (don’t skip!)
Isometric means the muscle contracts but the joint does not move. You’re creating tension without any joint motion. For a painful, irritated tendon, this is often the safest place to start. This stage builds tolerance without compression forces at the insertion.
There’s also reasonable evidence that isometric loading can reduce tendon pain fairly quickly, which makes it a useful tool when you’re stuck in a flare-up and can’t do much else.
Standing calf hold (isometric)
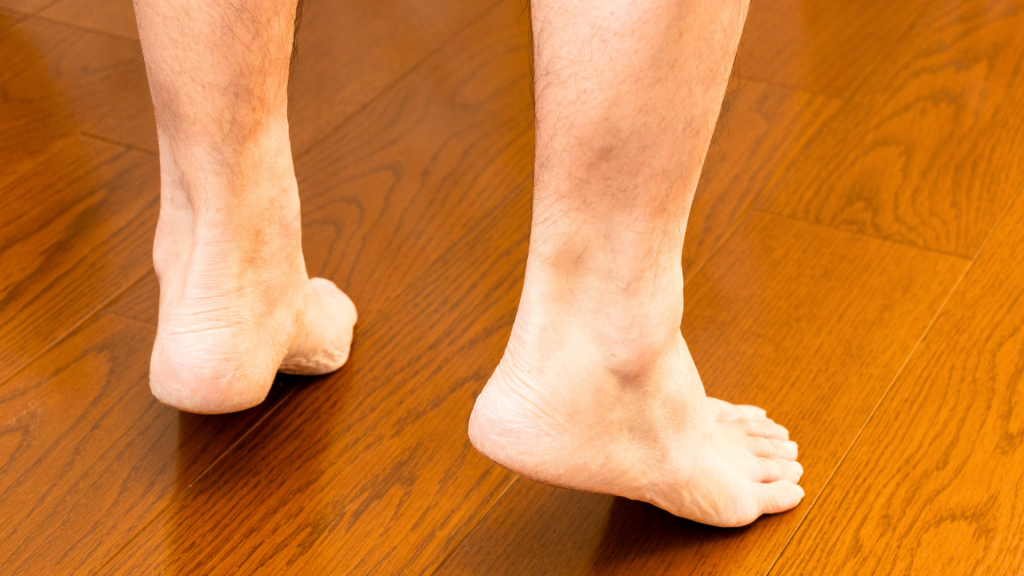
- Stand on both feet with heel lifts in your shoes
- Rise up onto both toes and hold for 30-45 seconds. Don’t bounce or let the heel drop
- Keep the ankle neutral or slightly raised throughout
- Aim for 3-4 sets, once or twice a day
- It should feel like solid effort around 7 out of 10 but shouldn’t be painful
- If this still feels painful, you may need to do this with a lighter theraband or in sitting
Stage 2: Slow strengthening: where most people go wrong
This is the stage that trips people up. Traditional eccentric heel drops work well here for midportion Achilles pain. But for insertional tendinopathy, they need to be modified.
The descent stops at neutral. Not below the step, and not into a stretch. The heel drops to level and no further. You use your other foot to get back up to the raised position, which means the affected side is only working during the lowering phase and only within a safe range.
For people who find even this version irritates their heel, heavy slow resistance training (HSR) is a good alternative. It combines lifting and lowering at higher loads and slower speeds, and produces similar outcomes with often better tolerance.
Do not stretch your calves during this program. This means no pushing the knee forward over the toes, no wall stretches, no pulling the toes up. These positions are the exact ones that compress the insertion and they directly undo what your exercises are trying to achieve.
Modified heel raise (slow eccentric)
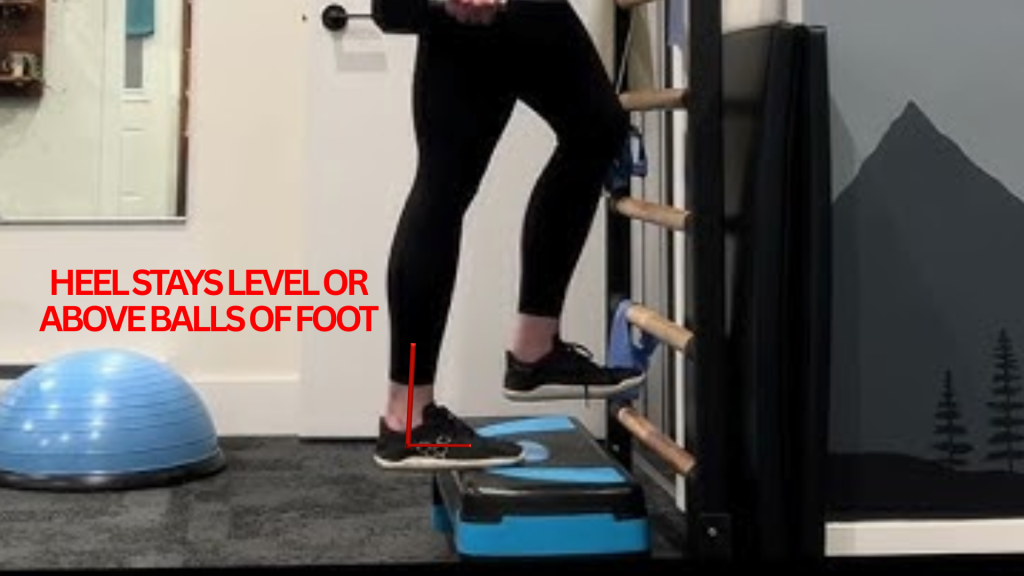
- Stand on a step with heel lifts in place
- Use your unaffected leg to rise onto both toes
- Shift weight to the affected foot and slowly lower. Stop when the heel is level with the ball of the foot. No lower.
- Use your good leg to return to the raised position
- 3 sets of 15 reps, twice a day. Knee straight for one set, slightly bent for another
- Progress by adding load over weeks 3-8 (a backpack with some weights works fine)
Stage 3: Teaching the tendon to spring
Once you’ve built a foundation of strength, the tendon needs to learn how to behave like a spring, absorbing and releasing energy quickly. This is what it does every time you walk fast, jog, jump, or change direction. Without training in this capacity, people often get to this point in rehab and find their tendon breaks down again the moment they return to sport.
This stage uses controlled hopping and bounding. Heel lifts stay in. The focus is keeping contact through the forefoot and mid-foot, not landing flat-footed or with a heel strike, which would drive dorsiflexion at the worst moment.
Double-leg pogo hops
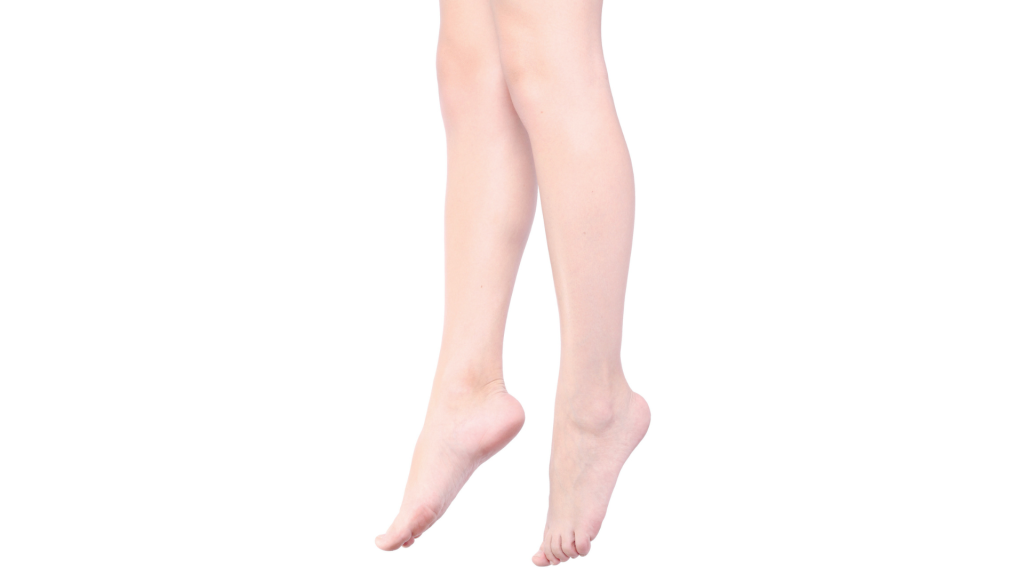
- Heel lifts in shoes
- Small, quick hops on both feet. Stay on the balls of your feet throughout
- Land softly and immediately bounce back up; heels should barely touch the ground between hops
- Start with 3 sets of 10; build toward 3 sets of 30 over a couple of weeks
- Single-leg hops come later, only when double-leg is completely comfortable
- Make sure you warm up with lighter exercises as previously mentioned for maximum benefit
Stage 4: Getting back to what you actually want to do
This stage looks different for everyone. A runner needs a gradual return-to-run program; walk, then walk-run intervals, then continuous running, then pace work. Someone who plays tennis or netball needs cutting movements and lateral loading before they’re back to match play.
Heel lifts continue throughout. Movements that involve extreme dorsiflexion, like a deep squat, a lunge with the knee far forward, or aggressive downhill running are progressed in carefully. The tendon can handle these eventually; it just needs to get there gradually. Be mindful of how you feel after and during the activity, and that should guide you with your progression.
The three things that run through every stage
No matter where you are in the program, three non-negotiables stay the same:
Wear heel lifts all the time
Not just during exercise. A 1-2 cm lift in both shoes keeps the tendon slightly shortened and reduces compression at the insertion throughout the day. This is simple but genuinely effective.
No calf stretches
Not after exercise, not in the morning, not to “loosen things up.” For insertional tendinopathy specifically, this is one of the clearest recommendations in the literature. Roll, use the massage gun to loosen up the calf muscle, but don’t stretch!
Keep the ankle from bending too far up.
Every exercise is performed within a limited range. The heel never drops below neutral. This is the single most important modification in the whole program.
How do you know when to push and when to back off?
Pain is a useful guide here. Not something to completely avoid, but something to monitor. The general principle used across tendinopathy rehabilitation goes like this:
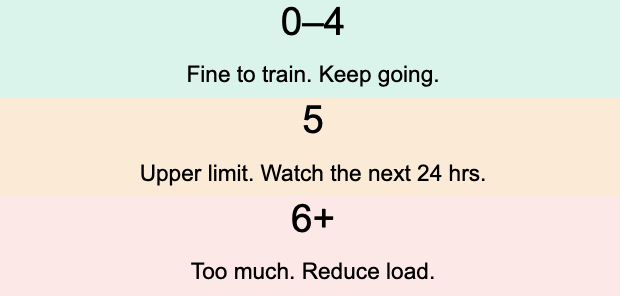
Pain during the exercise should stay at or below 5 out of 10. More importantly, if you’re still noticeably sorer the following day, that session was too much. Scale back the load or reps next time rather than pushing through and hoping it settles.
As for how long this takes, it genuinely varies. Research suggests runners tend to reach meaningful recovery around 82 days on average. The tendon moves slowly. Working on the program a bit consistently every day beats heavy intensity in a short period of time.
What this all comes down to
Insertional Achilles tendinopathy isn’t just a case of a weak tendon that needs more loading. It’s a tendon that’s being compressed at the bone, in certain positions, often repeatedly. This compression is what keeps it irritated and hard to heal.
Changing how you exercise matters more than how hard you exercise. Heel lifts, no calf stretching, and keeping the ankle out of full dorsiflexion during loading. They’re the actual mechanism of recovery. If you are feeling like your calves are super tight and heavy, you can use a massage gun, do some trigger point release, and/or roll out your calves.
If you’ve been struggling with heel pain for months and feel like nothing is working, there’s a good chance it’s not that you haven’t tried hard enough. It’s that the approach hasn’t matched the problem. That’s worth addressing properly. Check with our team at EastWest Physiotherapy in Burnaby for a consultation and treatment to guide you in your heel pain recovery. Other effective techniques such as Acupuncture, Dry Needling (IMS), manual therapy, and supportive taping can often speed up the healing process of heel pain. They may be used according to our assessment, treatment recommendation and client comfort.
EastWest Physiotherapy Burnaby
4388 Still Creek Dr Unit 201, Burnaby, BC, V5C 6C6
info@eastwestphysiotherapy.com
604-398-2936
About the author:
Mike Wong, MScPT (University of Alberta), BHK (Exercise Science) (UBC) is a Physiotherapist in Burnaby, BC and specializes in Orthopedic Physiotherapy, Acupuncture, Dry Needling and has a special interest in traditional Eastern Medicine treatment techniques.
Source
Pringels L, Capelleman R, Van den Abeele A, et al. Effectiveness of Reducing Tendon Compression in the Rehabilitation of Insertional Achilles Tendinopathy: A Randomised Clinical Trial. British Journal of Sports Medicine. 2025. Supporting references include a 2025 expert Delphi consensus on insertional tendinopathy exercise parameters, Alfredson eccentric protocol literature, Beyer et al. HSR vs eccentric training, and van der Vlist et al. recovery timeline data.